How I Design Bags and Purses: Part 1 | Part 2 | Part 3 | Part 4 | Part 5
Making and designing interesting and creative bags and purses is one of my favorite things to do, I’ve been making them since I was a small child, close to 50 years now, and I never tire of it! Over the years I’ve made hundreds of creative bags and purses – for myself, for others, for gifts, for fun – and along the way I’ve even managed to publish a few patterns.
 Although from time to time I do make bags that are functional, I prefer to make bags that are artful and unique – I think there is something magical about the whole process of designing and making a bag that is creative and one-of-a-kind. I like to make small bags using fabric and thread that are visually interesting in texture and/or design, and have a creative or artful twist, such as upcycled bags, bags with fun shapes, and art bags.
This week I’ve just started a new bag design so I thought it would be fun to share my process for designing and making a small bag. I don’t always have a logical approach to design, and I prefer to work intuitively, so things can sometimes get interesting. If you prefer a more structured approach to making bags and purses, you can find lots of online classes that will teach you those skills. However, if you enjoy a more artistic and less rigid approach, let’s see where the journey takes us.
Basically – it starts with inspiration, then an idea for a project forms, which then becomes a sketch, and then the construction process begins. Sometimes the end result is totally different from the original sketch, but because I like to work intuitively, I allow things to unfold rather than follow a rigid design and construction process. I find when I “allow”, magic happens.
Inspiration
My designs always start with some sort of inspiration. Inspiration arrives in many different ways and this time round I was inspired by this beautiful hand-dyed sari silk ribbon.
Sari silk ribbon is often used for knitting and crochet, however I like to work with ribbon in different ways to create unique pieces of fabric as well as fabric texture, and I knew that the silky softness of the raw-edged ribbon would be perfect for creating beautiful soft texture.
Plus I like the sense of history that this ribbon brings with it. The ribbon is imported from India where at one time real women wore these beautiful saris that are now old and aged with time and memories. Now stripped into long lengths of ribbon, the saris once again have purpose.
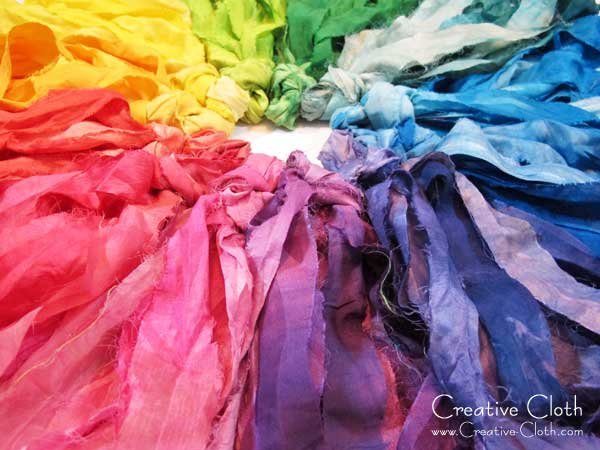
I picked a length of white ribbon and hand-dyed it a raspberry color. It’s very soft and feminine.

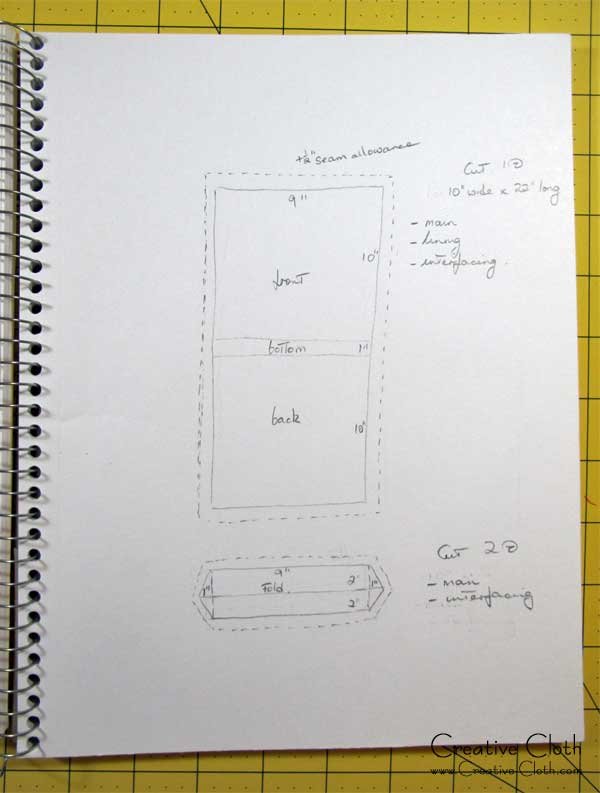
Sketchbook
For the bag design I kept things simple and small – a hip purse with ruffled texture on the front and back, and a small flap extension with hand stitched texture where I can thread some thick cording to use for straps. I usually do a rough sketch and write down all the information about the structure and components of the bag as well as the size. At this point I don’t worry too much about how I’ll sew it together.

Then I’ll sketch a rough drawing of all the pattern pieces that are needed to make the bag. This helps me begin the think about the construction process and how everything will go together. For this particular design, I know I can expect a few challenges. Even though there are only a few pattern pieces, there’s lots of ruffled texture as well as hand-sewing – could be tricky. Find Part 2 here.