Make the Bag Top
The bag top includes the top band, the straps, and the decorative belt. These pieces are all made into one section which is then sewn onto the bag body.
Make the Straps
Tip: This is a quick and easy way to make a lined strap, or a strap with faux piping down each side.
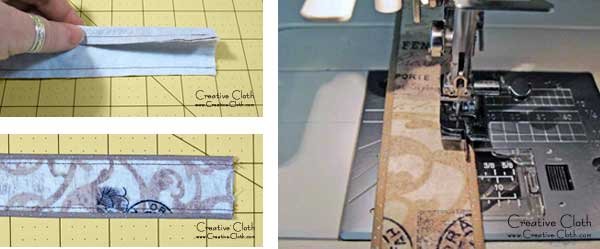
Iron the medium-weight interfacing to wrong side of the fabric straps. With right sides facing, place the 1-1/2″ strap on top of the 2″ strap, pin and sew a 1/4″ seam down both sides. The strap will be uneven.
Using a safety pin or a tube turner, turn the strap right side out. Finger press the seams so that the main strap fabric forms two faux piping stripes down each side of the contrasting fabric. Press with an iron. Topstitch down both sides of the strap close to the edge on the contrasting fabric.
Tip: Use a stitch-in-the-ditch sewing foot which has a center sewing guide, to sew an even row of topstitching down each side.
Make the Belt
Iron the medium-weight interfacing to the wrong side of the belt. With right sides facing, pin along the length of the belt and sew a 1/4″ seam as follows: Sew a 2″ seam. Leave a 3″ opening. Sew the rest of the seam.
Tip: Leaving a gap in the seam near the pointed end makes it very easy to turn the belt right side out.
Center the seam on the underside of the belt, and press open. Sew a pointed end onto the belt. At the end of the belt near the opening in the seam, start sewing 3/4″ in from the end, sew to approximately 1/8″ from the edge of the belt on the seamline, and then sew back down 3/4″ from the end.
Trim the seam close to the stitching. Through the 3″ opening in the seam, turn the pointed end right side out and carefully poke out the corners. Using a large safety pin or a tube turner, turn the rest of the belt right side out through the opening in the seam, using the same method as for the straps. Hand stitch the opening in the seam closed. Press and topstitch close to the edge.

Make the Bag Top
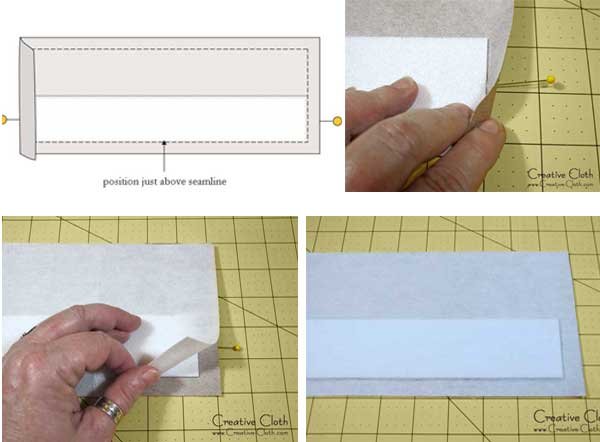
Iron the light-weight stabilizer to the wrong side of each of the bag tops. Trim 1/4″ from one end, and 1/8″ from the top of each piece of Peltex stabilizer so that the pieces measure 11-3/4″ wide by 1-7/8″ high. Trimming the Peltex will allow the fabric to fold neatly and not stretch out of shape. With the wrong side of the bag top facing up, center the Peltex between the side seams and slightly above the bottom seamline.
On each side, carefully lift and fold the edge of the fabric over the Peltex. Push a pin through the fabric and into the side edge of the Peltex to hold the stabilizer in place. Place the medium-weight stabilizer on top. Iron in place.
Tip: Run the tip of the iron around the edge of the fusible interfacing to make sure that it is well fused to the fabric.
Mark the Position of the Magnetic Snaps
With the wrong side of the bag top facing up, center the magnetic snap washer on the Peltex and mark the position of the snaps. Using a seam ripper, carefully cut along the marked lines. Do this for both bag top sections.

Attach the Straps
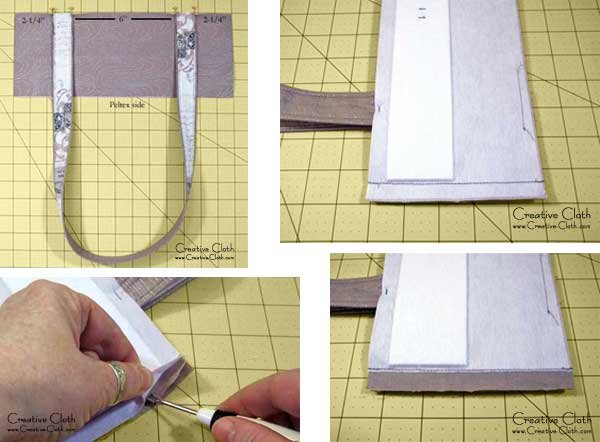
Place one of the bag tops on a flat surface, with the right side facing up and the end with the Peltex at the bottom. Position one of the straps along the top edge of the bag top with each of the strap ends 2-1/4″ in from the edge, leaving a 6″ gap in the center. Pin in place, then baste the ends in position. Do the same for the other bag top section.
With right sides facing, pin and sew a 1/2″ seam along both short sides. Carefully trim away the interfacing from the seam edges to reduce the bulk.
Tip: To remove fusible interfacing, hold a steam iron 2-3″ above the interfacing and apply a quick shot of steam. Using the dull edge of a seam ripper, quickly and carefully lift the interfacing from the fabric.
Using a sharp pair of small scissors, carefully trim away the interfacing close to the stitches. Press open the side seams. Test the fit of the bag top by pinning it to the bag body. Adjust if necessary.
Attach the Belt
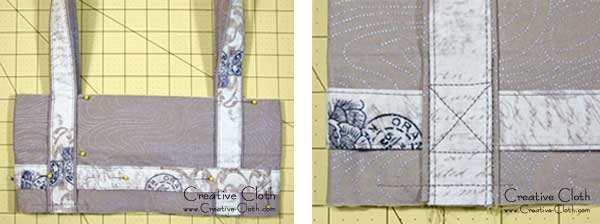
Turn the bag top right side facing up and place on a flat surface with the Peltex end at the top and the strap ends at the bottom. Position the end of the belt underneath the strap on the right side 1″ up from the bottom edge, and 2-1/2″ in from the side. Zig-zag stitch the raw edge of the belt to the top layer of the bag top. Fold the strap over the end of the belt and pin in place. Sew the front right bag strap to the bag top.
Sew along the seam between the faux-piping and the strap contrast, from the bottom edge up 2-3/8″ and lock the stitch at the top. Do this on both sides of the bag strap.
Position the belt all the way around the bag top and pin in place. The bottom edge of the strap should be positioned 1″ up from the bottom edge of the bag top. Fold the remaining three straps over the top of the belt and pin in place.

Sew the remaining bag straps in place
Sew each of the remaining three bag straps in place the same way as the first one. Sew along the seam between the faux-piping and the strap contrast, from the bottom edge up 2-3/8″ and lock the stitch at the top.
On each of the remaining three bag straps, sew a rectangle with a cross in the center over each of the sections where the bag strap crosses the belt. Extend the rectangle 1/8″ above and 1/8″ below the belt.
Attach the Magnetic Snaps
Insert the magnetic snaps on the front and back. Push the prongs through the slits to the back (wrong side of fabric), place the washer over the prongs, and fold the prongs back to secure.
Finish the Bag Top
With wrong sides facing, fold the bag top over with the belt on the outside. Match the raw edges, pin, and baste.

Coming up Next
In the next session we’ll assemble and finish the bag.
The Phoebe SewAlong
1. Welcome
2. Gather Your Supplies
3. Prepare the Pattern and Cut the Pieces
4. Make the Ruffled Panel
5. Make the Bag Body
6. Make the Lining
7. Make the Bag Top
8. Assemble the Bag


