Things to do with fabric scraps
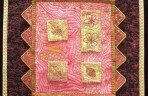
I was recently going through some of my old art quilts looking for samples where I’ve used fabric paper, and rediscovered this cute little art quilt “Scraps”. “Scraps” is about 18″ x 12″ and it was made from – well – scraps! – stuff that would normally end up in the rubbish bin. After teaching […]
Things to do with fabric scraps Read More »