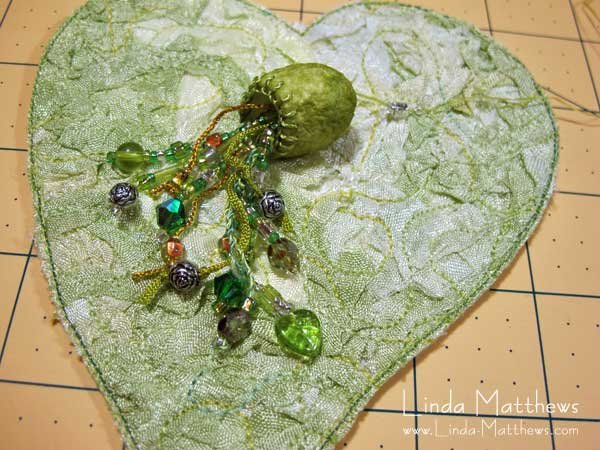
How to Make a Fabric Yo-Yo Look Titivating

Fabric yo-yos are really quite simple, both to look at and to make. It’s this simplicity that can often be overlooked or discounted when creating and embellishing with fabric. I remember when I was young that my grandmother used to have a beautiful bedspread made from yo-yos. I remember her spending endless hours sitting in the evening making hundreds of them from various types and colors of fabric, and then painstakingly sewing them together. The finished bedspread was stunningly beautiful in color and texture.

I’ve never had the ambition to make anything so lovely with fabric yo-yos, but I do love embellishing with them; you can use them for all sorts of different types of embellishment …

They’re are a fun way to display shisha mirrors.

Fabric Yo-Yo

You can even add some beads around the fabric yo-yo for additional embellishment.

Fabric Yo-Yo

You can put some bead dangles in the middle for a creative flower center.

Fabric Yo-Yo

Or just a single bead for a simple embellishment.

Fabric Yo-Yo

How to Make a Fabric Yo-Yo

It’s easy to make fabric yo-yos and you only need a few supplies:
- Fabric
- Circle template
- Fabric marking pen or pencil
- Sharp Scissors
- Strong thread
- Hand sewing needle

To make a fabric yo-yo, you need to cut out a perfect circle of fabric so first make sure that your fabric is pressed flat and wrinkle free. To size your yo-yo, the fabric circle should be cut approximately twice the size of the finished yo-yo; so for instance, if you wanted a 2″ fabric yo-yo, you would cut a 4″ diameter fabric circle.

For a perfect circle use a template to mark your fabric. A template could be the rim of a glass or mug, something that is perfectly round. Or you could simply print out a circle using a drawing program on your computer. MS Word and most word processing programs have simple shapes that you can design and print. Once you have your template, using a fabric marking pen or an ordinary pencil, trace the outline of the circle onto your fabric.

Fabric Yo-Yo

Once you’ve transferred your circle design to the fabric, carefully cut out the circle.

Fabric Yo-Yo

With the wrong side of the fabric facing up, fold over the edge of the circle about 1/8″ and using a small hand sewn running stitch, begin sewing folding the edge over as you go. Make sure you use strong thread, or you could double your thread to give it extra strength.

Fabric Yo-Yo

Continue sewing all the way round the circle.

Fabric Yo-Yo

Gently pull the thread so that the fabric starts to bunch up.

Fabric Yo-Yo

Continue pulling the thread gently until the edges are fully gathered, then make a small knot to secure the thread. Arrange the center hole so that the gathers are evenly distributed and laying flat.

Fabric Yo-Yo

Easy, right? An if you want to add a bead dangle to the center of the yo-yo, you can find instructions here.

This post is part of the 30 Days of Titivations; a 30 day blogathon all about embellishing and embellishments.

You can find lots of free embellishment tutorials in the tutorials section of my blog which can be found here, and even more techniques can be found on my Titivations DVD. Please visit the Instructional DVD section of the store for full details.

… Continue reading

Bead Dangles – Tutorial

Beading is one of my favorite methods of embellishing my art quilts and other projects, and I like to use lots of bead dangles; I just love the way that the hanging beads add movement.

Bead Dangles

Bead Dangles

Bead Dangles

Bead dangles are easy to make and don’t take a lot of time. Just be sure to use strong beading thread.

Instructions
Thread a beading needle with a short length of beading thread approximately 18” long.
Run the needle through the batting for approximately 1”, bringing it up at the point where you want to add your dangle, and secure with a small knot into the fabric.

String your beads onto the thread for the required length. Add an extra large decorative bead, or even a charm, at the end of the string. This helps to weigh the dangle.

Bead Dangles

Add one last very small bead. This will be used as a stop bead. Bypassing the stop bead, bring the needle up and travel back along the bead string to the beginning.

Bead Dangles

Tie off in a double knot to ensure the dangle is secured firmly. Now add some more dangles because one is never enough, varying the length of each for added interest.

Bead Dangles

And that’s how easy it is!

This post is part of the 30 Days of Titivations; a 30 day blogathon all about embellishing and embellishments.

You can find lots of free embellishment tutorials in the tutorials section of my blog which can be found here, and even more techniques can be found on my Titivations DVD. Please visit the Instructional DVD section of the store for full details.

… Continue reading