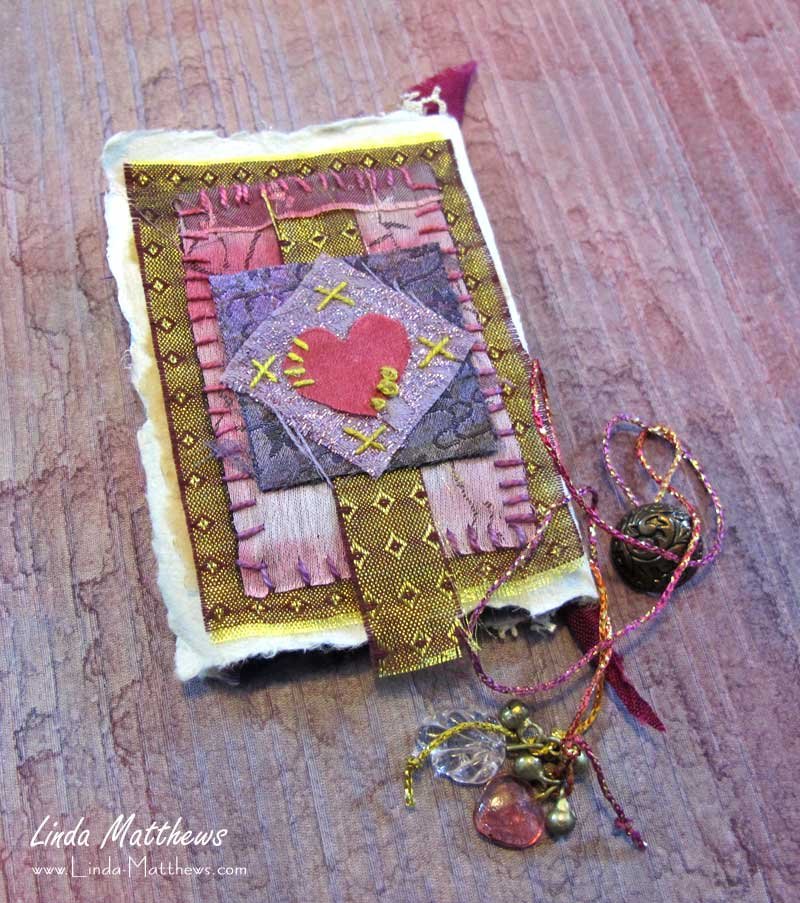
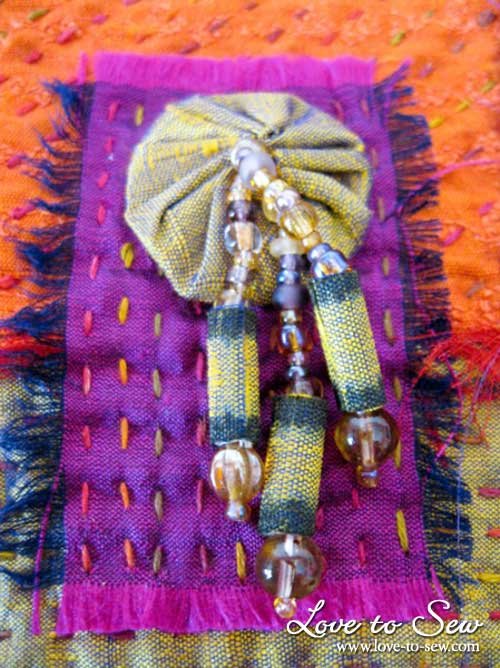
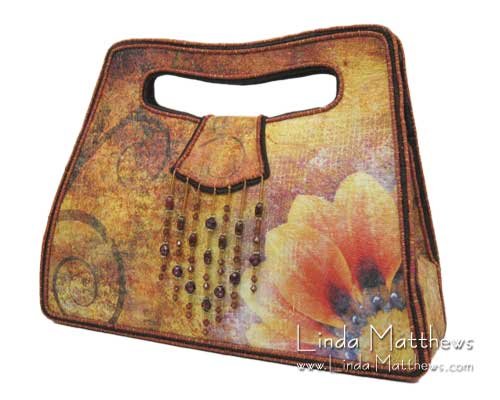
Free Purse Patterns & Tutorials

I’ve just updated my Free Purse Patterns & Tutorials Listings, so if you’re looking for some new free purse patterns and tutorials, then run over and have a look.

Added 30 May 2010
Free Purse PatternsFree Purse PatternsFree Purse Patterns

Free Purse PatternsFree Purse PatternsFree Purse Patterns

Free Purse PatternsFree Purse PatternsFree Purse Patterns

Free Purse PatternsFree Purse PatternsFree Purse Patterns

Free Purse PatternsFree Purse PatternsFree Purse Patterns

Added 15 May 2010

Free Purse PatternsFree Purse PatternsFree Purse Patterns

Free Purse PatternsFree Purse PatternsFree Purse Patterns

Free Purse PatternsFree Purse PatternsFree Purse Patterns

Free Purse PatternsFree Purse PatternsFree Purse Patterns

Free Purse PatternsFree Purse PatternsFree Purse Patterns

Free Purse Patterns

Continue reading

2 Comments Posted in Free Stuff
Tagged ,

You might also like


Things To Do With *Injured* Prints

Before I upgraded to my new wide format Epson printer, I was using an old HP wide format to print my large images. It did a fair enough job but it was rather finicky about what what I fed through it and this resulted in a number of very large prints with some sort of misprint.

You can see on this photo that there is a stripe running through the print. This happened when the paper carrier got caught and wouldn’t feed although the printer kept printing. So it printed over the same section a few times before I managed to free it. As you can also see, it was only a few inches from the end of the print which was about 11″ x 15″ in size so it was a little annoying when it happened.

Image Transfer Wallet

I didn’t throw the print out knowing that one day I would find a use for it. And that day finally arrived when earlier this week I decided I needed a new wallet and this print was the perfect size once I trimmed away the misprinted piece. The finished size of the wallet is about 7.1/2″ x 4.1/2″ folded …

Image Transfer Wallet

… and about 11.1/2″ open. I used digital grounds to print the image so the color is very vibrant, and then I sealed it with a paint-on sealer so now the fabric is protected from dirt and grime and needs only a wipe to clean it, and it can also withstand the rough use that a wallet usually gets.

Image Transfer Wallet

The great thing about designing your own purses and wallets, is that you can make them to your own specifications and include extra pockets and holders as needed, so I added an open pocket for notes and a zipped pocket for change.

Image Transfer Wallet

I made the center section flip, so on the other side I have a pocket with a tab so I can store other bits and pieces securely, and also another open pocket for receipts and my check book.

Image Transfer Wallet

I edged it with some machine wrapped cording and a zig-zag stitch, and added a small unobtrusive snap for closure. I like the way the wallet turned out and I like it even more because I finally found a use for the print. Now, I just need to find uses for the other dozens of *injured* prints that I have lying around!

Image Transfer Wallet

Continue reading

5 Comments Posted in Accessories, Creative Recycling, Digital Art, Digital Grounds, Images on Fabric, Tutorials, Wearables
Tagged , , ,

You might also like


The Care and Feeding of Fabric: Sticky Labels

The other week I showed you how to prepare fabric for printing using freezer paper as a carrier. This week let’s look at my preferred method for feeding whole sheets through the printer using full-page size sticky labels instead of freezer paper.

With printer ink the price that it is, I always like to ensure that each print has the best possible chance of turning out great and using sticky labels ensures that your fabric is *really* stuck to the carrier paper and won’t come loose as sometimes happens when using freezer paper. Sticky labels also tend to feed through your printer better because they are sturdier than standard freezer paper. Sticky labels are a little more expensive than freezer paper, however I can get up to about a dozen prints from each sticky label (using cotton fabric) before the sticky stuff wears off.

Start by gathering your supplies
1. Full sheet labels. Avery is a good brand and can be found at your local office supply store.
2. Fabric. The best type of fabric for inkjet printing is a fabric with a tight weave which will produce a nice even print.
3. Brayer with a hard roller. A brayer is a hand roller and can be found at your local craft store. Brayers come with either a soft or hard roller. The soft roller is used for printing and painting, but the hard roller is the one you need for this technique.
4. Scissors, or ruler and rotary cutter.

Printing on Fabric using Sticky Labels

Cut and Iron your Fabric
Cut a piece of fabric slightly larger than the sticky label and iron to remove the wrinkles.

Printing on Fabric using Sticky Labels

Prepare the Sticky Label
Remove the backing paper from the sticky label and snip a small corner of the label. This will allow you to easily lift the fabric in order to remove it from the label once it’s been printed.

Printing on Fabric using Sticky Labels

Stick the Label to the Fabric
Place the sticky label sticky side down on top of the fabric, and using your fingers press the label in place.

Printing on Fabric using Sticky Labels

Use the Brayer
Turn the label over so that the fabric is facing up and run your brayer over the top of the fabric. It’s very important to make sure that the fabric is securely attached to the sticky label and there are no wrinkles or bumps in the fabric.

Printing on Fabric using Sticky Labels

Trim the Fabric and You’re Done
Using scissors, or a ruler and rotary cutter, trim the fabric to size ensuring that all loose threads are trimmed. Your fabric is now ready to go through the printer.

Printing on Fabric using Sticky Labels

And that’s it! Your fabric should now feed through the printer easily, without any jamming or other accidents.

I also use this method for printing on organza and other sheer fabric and you can find full instructions here.

Continue reading

1 Comment Posted in Image Transfer, Images on Fabric, Tutorials
Tagged , ,

You might also like


Creatively Recycled: Buddha Bag

It’s amazing what you can do with a few scraps of fabric and a little imagination! As you know I’ve recently been on a mission to recycle and repurpose some of my fabrics and ufos. Last week I showed you the results of turning an old forgotten applique ufo into a beautiful tote bag. Today say hello to the Buddha Bag.

I love to use overdyed silk kimono fabrics; the fabric is beautiful to look at and to touch and I don’t like to waste even the smallest piece. (PS – You can find scrap bags online at Laura Murray Designs.) And they are particularly perfect for Asian inspired projects such as this Buddha Bag.

This is a small tote bag, the body is about 8.1/2″ wide by 9″ high, and it was made from some leftover scraps of silk kimono fabrics and an old inkjet print on organza of the Buddha. I do a lot of test inkjet prints on fabric which often are unsuitable for the project in mind because of size or other reasons, so I throw them into a drawer to use for other projects later on. This image was quite large so it was perfect for this project. If you’re interested in learning how to print on sheer fabrics, I explain how I print on organza in this post.

The fabric on the front of this bag has lovely metallic thread designs woven through it, as has the fabric underneath the image, so the image sparkles depending on which way you look at it. I really like the way it turned out and I think the Buddha looks very serene surrounded by all that beautiful fabric.

Buddha Tote Bag

The back of the bag is also a piece of overdyed silk kimono fabric. This piece was originally a block in an art quilt that never quite got finished so I pulled the quilt top apart and this piece was just the perfect size for the back of the bag. Don’t you love it when things work out so perfectly? The fabric has a piece of bamboo stenciled onto it using paintstiks, and I also added some gold foil for additional surface design.

Buddha Tote Bag

I’ve just added the Buddha Bag and some other items to my Etsy Store, where you’ll also find additional photos and information.

I love all this recycling and repurposing and I have various other projects in progress, but this week I also hope I can get back to working with my digital grounds; I kind of got sidetracked with this recycling thing, but I’ve got a few project in progress that I hope to show you soon.

Continue reading

Leave a comment Posted in Creatively Recycled, Images on Fabric, Inspiration, Wearables
Tagged , , , , ,

You might also like


Creatively Recycled: From Tablecloth to Applique to Tote

I get a strong sense of satisfaction when I finish a project to completion, and I’m sure you do also, but in opposition I also feel a strong sense of dissatisfaction when I don’t finish a project. Because of this, I tend to put my ufos away out of sight so I’m not constantly reminded that I didn’t finish them.

There are on occasion, projects that I *really* love and *really* intend to finish one day, and these I pin to my design wall so they are always in view. But like most things in life, if we see something every day it eventually becomes invisible.

As I mentioned the other day here and here, I’ve been keeping myself busy these last few weeks by recycling some of my unwanted fabric into bags and totes and other odds and ends, and unfortunately one of my much loved (but invisible) ufos got in the way of my line of vision this week as my mind was ticking over about other types of stuff I could “creatively recycle”, and this is the result.

Overdyed Applique Tote

Originally this project was intended to be a focal design for a wearable art jacket, and it’s been a good couple of years since I started it. The fabric originally was an overdyed damask tablecloth and a piece of overdyed japanese kimono silk, and the intricate machine applique was painstakingly sewn using a very small zig-zag stitch and decorative machine stitches. I should have taken some *before* photos, but … oh, well. The finished size of this beautiful tote is approx 13″ high by 11″ wide and I have to admit, I think I like it much better as a tote.

Overdyed Applique Tote

Because the applique design was so large, it wraps around to the back – I love it!

Overdyed Applique Tote

Look at those tiny stitches, I can’t even image how I was patient enough to do all this.

Overdyed Applique Tote

You can see the lovely damask design on the background fabric; the design became very subtle once the fabric was overdyed.

Overdyed Applique Tote

This creative recycling has been incredibly rewarding and I have quite a few items completed already, mostly from recycled ufos and unused samples, and I have *lots* of samples and ufos and other odds and ends lying around so I expect this recycling project will keep me busy for a very long time. I’ll be adding these items to my Etsy store some time over the weekend so stop by and have a look.

Continue reading

2 Comments Posted in Creatively Recycled, Inspiration
Tagged , ,

You might also like


Felting in the Raw

Machine Needle FeltingI was recently scrounging around up in the attic and stumbled across some left-over packs of white and natural colored roving, felt and fibers. I used to sell these packs some time ago along with my Felt-Punch-Embellish DVD which contains several sections on how to paint and dye your own fabrics and fibers for use with your needle felting machine.

These are great starter packs when working with the DVD, and they contain a wonderful collection of fibers in white or natural color, conveniently packed, and just ready to be painted or dyed and used with your needle felting machine to make marvelous and unique textile art.

What’s in the Pack

Roving 1 oz Silk Tussah – ooooooh so soft, silky and with a beautiful luster.
  1 oz Corriedale Wool – lovely and soft, very easy to needle felt.
Yarn Over 20 yds of textured yarn – fun to needle felt, particularly using a tulle underlay.
Felt 2 pieces of White Acrylic 12″ x 9″ – for quick and easy needle felted landscapes.
Misc 3/4 oz Silk Throwsters’ Waste – lovely dense texture.
  3/4 oz Silk Carrier Rods – little bits of lovely thick silk; great texture.

The price is $29.95 and includes Priority Mail Shipping within the US. If you want overseas shipping, you can contact me for a price.

So if you have a need for some fibers in the raw for use with your needle felting or textile art, then go grab a pack. There are only a few packs available and once they’re gone, that’s it!

And if you haven’t yet picked up the Felt-Punch-Embellish DVD, grab one of those as well. Visit the Instructional DVD Section of the store for ordering and details.

This photo is a collection of fibers, yarns and roving, hand painted and dyed to color coordinate.

Machine Needle Felting

This wings on this butterfly were made using machine needle felted fabric with holes burnt into it; the body is a piece of hand dyed silk carrier rod from the samples in the photo above.

Machine Needle Felting

A piece of corriedale roving dyed with food coloring – yes, food coloring!

Machine Needle Felting

The same roving once it was needle felted – beautiful and soft with a lovely color.

Machine Needle Felting

Warning: Machine needle felting is extremely fun and creative and you’re bound to end up addicted to it. If you haven’t yet picked up the Felt-Punch-Embellish DVD, what are you waiting for?

Continue reading

Leave a comment Posted in In The Store, Special Notices
Tagged , , ,

You might also like


Photoshop Elements: Colored Vignette

Photoshop Elements Colored VignetteA couple of weeks ago I posted a tutorial for making a vignette with a faded edge. Today I’ll show you a way to make a colored vignette. A colored vignette can be used to highlight an area of your image to draw focus to it.

Note: This tutorial is for Photoshop Elements 6, but the instructions should be the same or similar in other versions.

1. Download the image. We’ll use the same image as for the previous tutorial so you can see a comparison in results between the two.

Photoshop Elements Vignette Download hands from Morguefile.com

2. Once you’ve downloaded the image, open it in Photoshop ELements.

Photoshop Elements Vignette

3. Select the elliptical marquee tool.

Photoshop Elements Vignette

4. Enter the radius. I chose 200px, but if you have resized your image, you may need to adjust this number.

Photoshop Elements Vignette

5. Click and drag the tool around the area you want to keep which is the hands and invert this area. You can invert it by selecting from the Main Menu
Select
Inverse
Or use the keyboard shortcut Ctrl+Shift+I

Photoshop Elements Vignette

These first five steps are the same as for the previous tutorial for making a faded edge vignette. Now we’ll do things a little differently.

6. Create a new layer. You can name it if you like; something like “vignette”.

Photoshop Elements Colored Vignette

7. With the new layer highlighted …

Photoshop Elements Colored Vignette

… click the foreground color to open up the color picker tool and with the eyedropper, select a color from the background of the image. Click ok to close the color dialog box.

Photoshop Elements Colored Vignette

8. Click the paint bucket tool …

Photoshop Elements Colored Vignette

… and then fill in the inverted area around the hands.

Photoshop Elements Colored Vignette

9. On your keyboard press “Ctrl D” to close the selection.

Photoshop Elements Colored Vignette

And that’s it! By filling the background with different colors you can easily change the mood and focus of the image. You can even fill the background with white which is another way of making a faded edge vignette.

Photoshop Elements Colored Vignette

Or use different colors.

Photoshop Elements Colored Vignette

Photoshop Elements Colored Vignette

You can also adjust the opacity to change how much of the background shows through the vignette.

Photoshop Elements Colored Vignette

Photoshop Elements Colored Vignette

Enjoy and have fun!

Continue reading

Leave a comment Posted in Images on Fabric, Photoshop Elements, Photoshop Elements, Tutorials
Tagged

You might also like


More Creative Recycling

Do you ever have creative ideas that just won’t let go? I often do, but I also think that they also serve a purpose. Creative ideas can push us to do better, or different, or even push us to explore further; to take our creativity to places it has never been before. They can also serve to distract us in times of stress, and allow our stress to take form and shape in a healthy way.

News of my mother’s recent illness arrived at the same time as I spotted an old dress laying in the corner which subsequently was recycled into this tote bag. And as the days pass as I wait for more news, feeling a little helpless so far from home but knowing that I couldn’t do anything more even if I were home, it eases the anxiety a little to be distracted by simple things like creating something new from something old.

And so as well as the tote, I now also have a new purse made from the fabric of that old dress.

And I still haven’t used up all the fabric!

Either that was an old “fat dress” (all you ladies will know what I’m talking about) or it just had a lot more fabric than I first thought because there’s still more than enough fabric for another purse or small tote.

Goodness knows I don’t need another handbag, purse or tote, so they might make nice presents for someone, or you might even see them in the store very shortly.

And I’m now seeing a lot more stuff lying around my sewing room that could easily be creatively recycled. I hope my mother gets better soon so I can get back to some “real” work.

Continue reading

2 Comments Posted in Creatively Recycled, Inspiration, Wearables
Tagged ,

You might also like


Free Images

Free ImagesIf you’re not a photographer (or not a very good one like me), or are looking for a very specific type of image to use for your digital art, it can be challenging and sometimes frustrating to find that your great idea might have to remain just that … a great idea … simply due to lack of a good, high resolution image that will print well on fabric.

There are lots of places on the internet where you can find free images but more and more I find that you need to sign up for an account which can be a pain depending on how much personal information these sites ask for. Back in May 2009 I posted this article – Finding Free Images on the Internet – listing some websites where you can find free images but I thought this time I might share some of my links to websites that offer free images and require nothing from you but to simply click and download.

As always, make sure you read the terms of use or copyright for each of these sites; sometimes “free” comes with limitations. I’ve included links to the terms of useage for each of the websites to make it easy for you.


Morguefile.com

Morguefile.com

Notes
Morguefile is one of my favorite sites for downloading images. These images are uploaded by individual photographers so there is always *lots* of interesting, creative, high resolution images available.

The terms of use for each photo can be found underneath the image, once you click on it to download.


Visipix

Visipix

Notes
Visipix is also another of my favorite sites, and I particularly like that they have individual fine arts, photograph and clipart sections so you can usually find exactly what you need without too much trouble.

Read their terms of use


FreeTextures.org

FreeTextures.org

Notes
FreeTextures.org offers lots of lovely high resolution texture images available. They also offer bundled images for sale, so if you’re looking for lots of texture images you can purchase and download in one hit rather than individually.

Read their terms of use


Mayang’s Free Textures

Mayang's Free Textures

Notes
Mayang.com also offers lots of high resolution texture images. You are limited to downloading 20 images per day because of their server limitations, or else you can buy the complete texture library on DVD.

Read their terms of use


Image After

Image After

Notes
ImageAfter.com offers high resolution image – texture, nature and architectural.

Read their terms of use.


FreePixels.com

FreePixels.com

Notes
FreePixels.com offers free, high resolution stock photos and images in various categories.

Read their terms of use.


FreeImages.co.uk

FreeImages.co.uk

Notes
Lots of high resolution images in various categories.

Read their terms of use.

Continue reading

Leave a comment Posted in Free Stuff, Images, Images on Fabric

You might also like


Pretty Things For Your Feet

I recently became a fan of Tracy Porter who has an online blog and store, and not in the least because of these beautiful slippers which are now at the top of my birthday list.

Textiles for your Feet

If you love all things beautiful and exotic, then visit her store for lovely clothing and home dec items. Or if you prefer, go directly to the slippers. And if you’d love a little inspiration to get you through your day, visit her blog.

Also if you sign up for her newsletter, she frequently sends out incredible sale notices which makes all her lovely things a little more affordable. No affiliation, just a gently reminder that life always looks much better when you surround yourself with beautiful things.

Continue reading

Leave a comment Posted in Inspiration, Interesting Websites
Tagged

You might also like